

This quick, low-prep craft makes a magical little gift: secret message cards that reveal a hidden note with a homemade “magnifying” wand. Perfect for Valentine’s Day or for making encouragement cards for friends and family who don’t celebrate Valentine’s, the project uses recycled plastic from bakery containers, cardstock, and markers. My kids loved writing Bible verses and hiding them under a scribble — then sliding the colored plastic magnifier over the message to reveal it. Make your own secret message card!
Materials for Secret Message Cards
- CARD: Sturdy white cardstock (card-sized)
- WAND: Extra cardstock, kraft paper, or cardboard.
- LOOKING GLASS: Clear plastic from a cookie/bakery container (trim to size).
- Permanent red marker (for coloring the plastic)
- Red Crayola marker (or any washable red marker) for scribbling.
- Light blue pen or light blue colored pencil (to write the secret message).
- Scissors and craft knife (adult use).
- Clear tape (optional)
- Ruler
- Pencil
How To Create Secret Message Cards
Step 1
Color the plastic: Cut a piece of clear plastic from a bakery or cookie container slightly larger than the window you’ll cut in the wand. Color one side thoroughly with a red permanent marker. Let dry.


Step 2
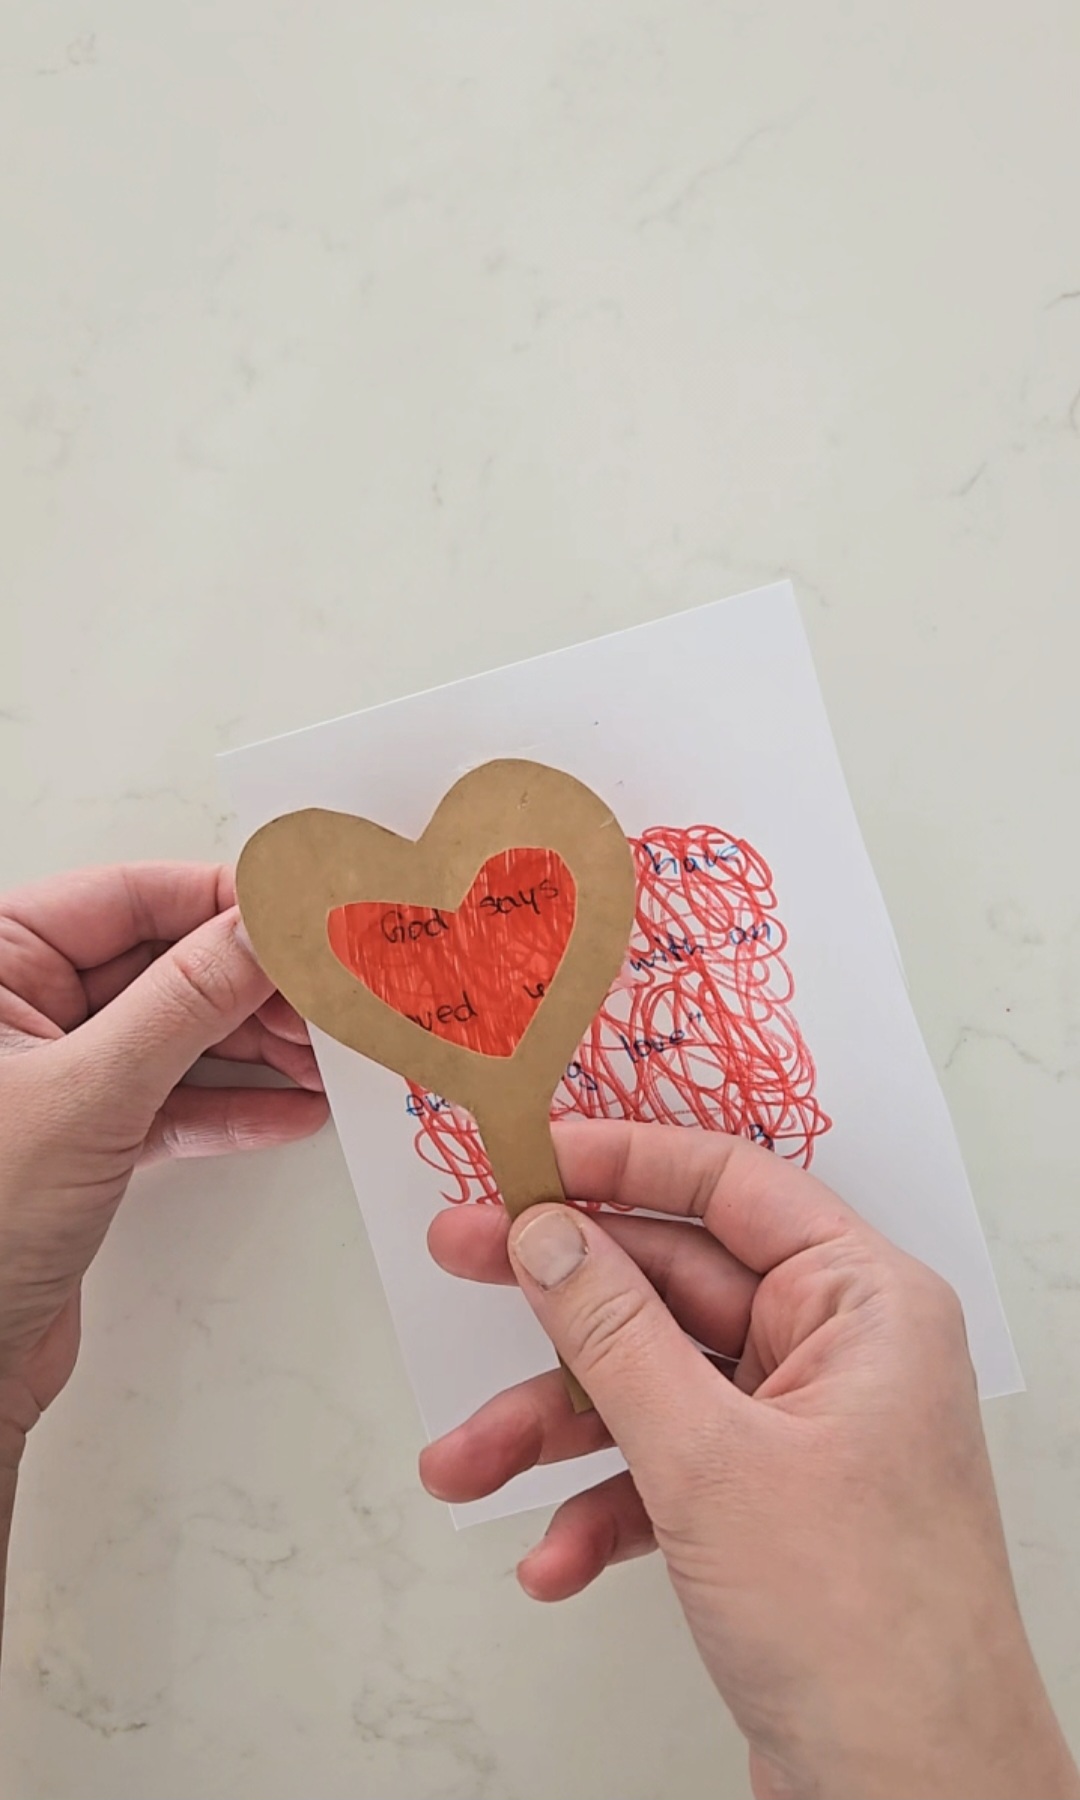
Make the wand frame: Cut a magnifying-wand shape from cardstock or kraft paper (rectangle, round, or heart-shaped top). Cut an opening in the center where the “lens” will sit (a heart-shaped opening looks so sweet for Valentine’s).
Step 3: Attach The Plastic
Fit the colored plastic over the window from behind and secure with tape or a small dab of glue/staple just above the wand’s “handle” edge so it can slide into the card slot easily.

Step 4: Write the Secret Message Card
Fold a piece of white cardstock to card size. Using a light blue pen or pencil, have the child write a short secret message inside. (Bible verses, kind notes, or short phrases work great — see verse ideas below)


Step 5: Hide the Message
With the red Crayola marker, scribble heavily over the message until the writing looks completely hidden. The red scribble should make the message unreadable until viewed through the red-tinted plastic.
Step 6: Add A Slot
Make a small slit or slot at the top of the card (careful: adult step). Slide the wand handle through the slit so the “lens” can sit over the scribbled area. When someone lifts the wand and holds it over the scribble, the secret message becomes visible.

Step 7: Decorate & Mail
Add stickers, a little note, or a “To/From” and hand it off as a Valentine or an encouragement card.

Why this works (and why kids love it
The red-tinted plastic filters the scribbled color and lets the lighter blue ink contrast just enough to reveal the writing. It’s simple science + surprise = lots of giggles. This activity practices fine motor skills (cutting, coloring) and early reading/writing, and it’s a wonderful way to practice kindness and gratitude.
Bible verse & message ideas
Short verses and encouraging one-liners work best so the text is readable through the plastic. Copying down verses helps with memorization and practice handwriting skills.
Try:
- “God is love.” — 1 John 4:8
- “Be kind to one another.” — Ephesians 4:32
- “I can do all things through Christ.” — Philippians 4:13
- “The Lord is my helper.” — Hebrews 13:6
- “Trust in the Lord.” — Proverbs 3:5
- “You are fearfully made.” — Psalm 139:14
- “Love one another.” — John 13:34
- Simple encouragements: “You are loved,” “You are brave,” “Praying for you,” “You make me smile.”
Secret Message Card Variations & adaptations
- Use different colored permanent markers for a rainbow of “lenses.”
- Test which marker + ink combos reveal the message best.
- Make mini gift tags instead of cards — glue a smaller wand to a present.
- For toddlers: pre-write messages and let them scribble over the message & decorate the outside with stickers and stamps.
- For older kids: challenge them to write tiny secret codes and see who can decode first.
- You can create letter hunts for the alphabet using this method. See my video here
- Bilingual kids letter hunt video here
- Image hunt see my video here
- Free Printables (coming soon)
Tips & troubleshooting
- If the message isn’t showing up clearly, try using a slightly darker or different ink color for the message (navy vs. light blue) — but keep the contrast subtle.
- Make sure the red permanent marker is fully dry before handling the plastic.
- If the plastic is scratched or wavy, test a piece first — smoother/ harder plastic works best.
Secret Message Card Learning benefits
- Fine motor practice: cutting, coloring, writing.
- Early literacy: composing short messages.
- Practice Penmanship
- Memorize verses.
- Learn how mail travels / post office works.
- STEAM spark: simple color-filtering science.
- Social-emotional learning: expressing gratitude, kindness, and encouragement.
Want the Secret Message Card Video + more?
I shared a short reel showing how our wands work — you can watch it here.
If you enjoyed making the secret message card, save the PIN below and follow me on Instagram for more simple homeschool crafts and bilingual activity ideas!
More Posts To Check Out
How to Teach Kids Money Value ( Canadian Coins & Hands-On Activities)
11 Easy DIY Homeschool Resources You Can Make at Home
Fizzing Pumpkins: A Fall STEM Activity
What Homeschool Work to Keep or Toss – A Guilt Free Approach


